Advanced IVR (Reservation Example)
This tutorial will cover a more advanced IVR use case with a multi-level IVR tree. It extends upon the principles in the Simple IVR page, but build upon then by taking into account the current IVR state when responding to the user.
Initial setup should be completed as per the Webhook Setup Guide to configure a VSS and VCA Webhook before continuing with this guide.
Demo Video of Advanced IVR
This video will show a demo of how the Advanced IVR menu will work, including showing webhooks and the Initial API Call.
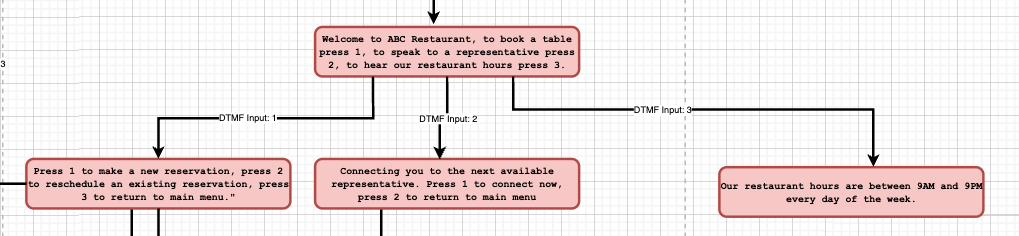
Diagram of Advanced IVR Flow
Below is a diagram showing the complete IVR Tree that we will build. It has potentially 3 levels in this IVR Tree and the goal is to allow a caller into a restaurant to both manage their reservation (the most common task), connect to a member of the restaurant staff and hear a message of the restaurant hours.
Note: What is not pictured is that any response that is not valid results in an error message and the call ending. This is done to simplify the diagram.

The colors correspond to the different levels of the IVR Tree which shows how many DTMF inputs a user will need to provide before reaching the corresponding menu item.
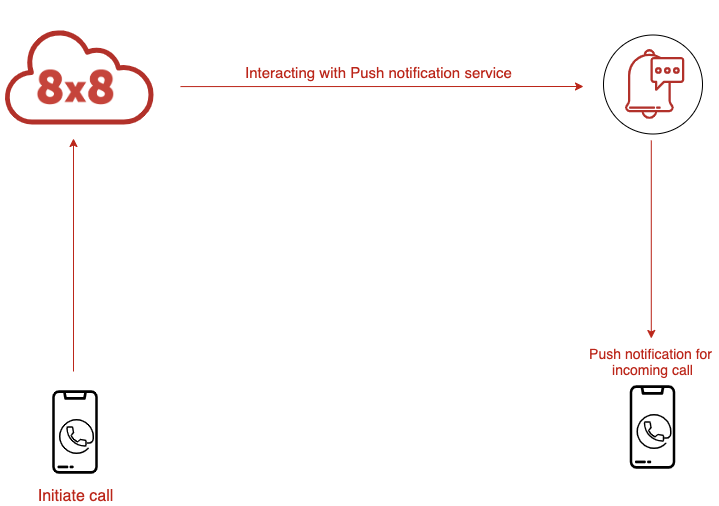
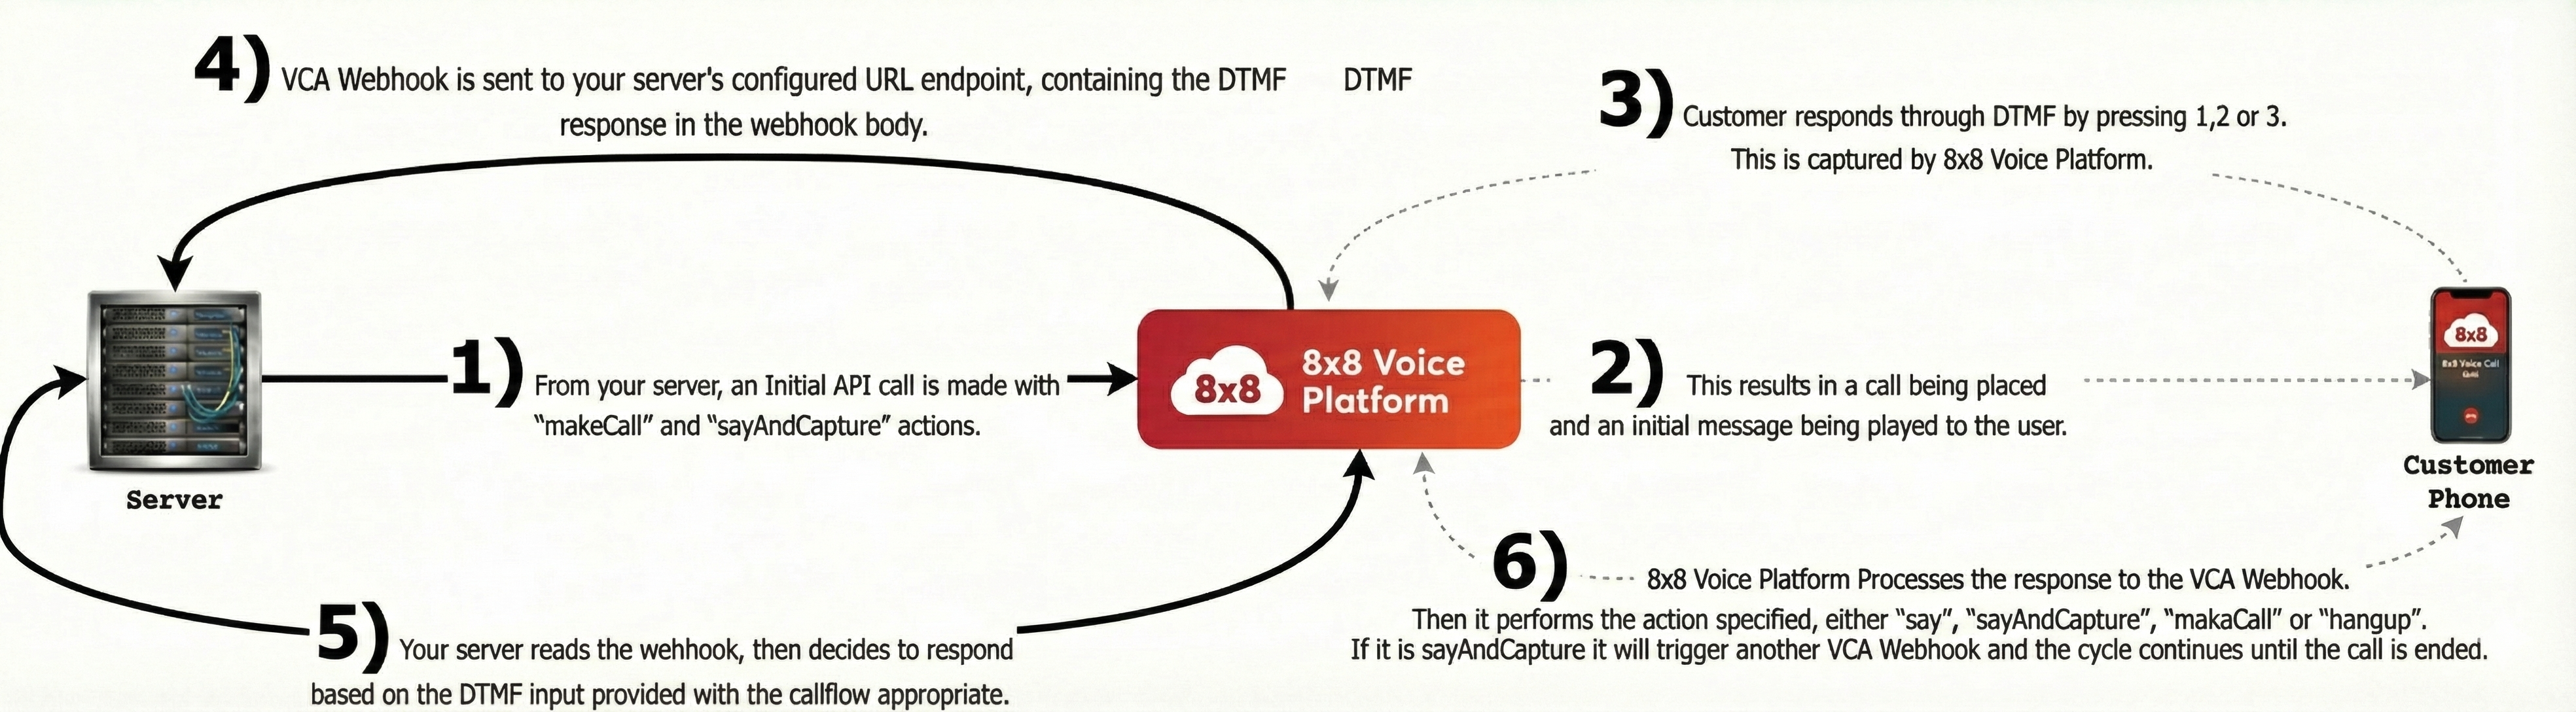
Diagram of Webhooks and API Calls
The basic flow of Webhooks and API Calls will be similar to the Simple IVR tutorial, your server will have to respond to multiple VCA Webhooks as the user goes deeper into the IVR tree, so that Callflows API can play the correct IVR Tree menu back to the user.
IVR Callflows
Initial API Call
The initial API call to place the outbound call is here:
/POST voice.8x8.com/api/v1/subaccounts/{sub-account-id}/callflows
This is the request body to send with the API request. It will make an outbound call, play a message and then capture a DTMF input from a user.
{
"callflow":[
{
"action":"makeCall",
"params":{
"source":"{{Virtual Number}}",
"destination":"{{Number to Call}}"
}
},
{
"action":"sayAndCapture",
"params":{
"promptMessage":"Welcome to ABC Restaurant, to book a table press 1, to speak to a representative press 2, to hear our restaurant hours press 3.",
"voiceProfile":"en-US-BenjaminRUS",
"speed":1,
"minDigits":1,
"maxDigits":1,
"digitTimeout":10000,
"overallTimeout":10000,
"noOfTries":1
}
}
]
}
IVR Tree: Level 1
IVR Tree: Main Menu
When the user responds to the initial DTMF input, they have a choice between 3 options. The table below shows the three menus and messages that are played for a user for a given DTMF input.
The code below the table shows the JSON that should be returned by your server to trigger the appropriate menu.
| DTMF Input |
Menu |
Message Played |
| 1 |
Reservations |
Press 1 to make a new reservation, press 2 to reschedule an existing reservation, press 3 to return to main menu. |
| 2 |
Connect Call |
Connecting you to the next available representative. Press 1 to connect now, press 2 to return to main menu |
| 3 |
Restaurant Hours |
Our restaurant hours are between 9AM and 9PM every day of the week. |
| Other |
Invalid |
Invalid input, please call again. |
Reservations
{
"clientActionId":"ivr-1-stage-1",
"callflow":[
{
"action":"sayAndCapture",
"params":{
"promptMessage":"Press 1 to make a new reservation, press 2 to reschedule an existing reservation, press 3 to return to main menu.",
"voiceProfile":"en-US-BenjaminRUS",
"speed":1,
"minDigits":1,
"maxDigits":1,
"digitTimeout":10000,
"overallTimeout":10000,
"noOfTries":2
}
}
]
}
Connect Call
{
"clientActionId":"connect_call",
"callflow":[
{
"action":"makeCall",
"params":{
"source":{{Source Phone Number}},
"destination":{{Destination Phone Number}}
}
}
]
}
Restaurant Hours and Hangup
{
"callflow":[
{
"action":"say",
"params":{
"text":"Our restaurant hours are between 9AM and 9PM every day of the week.",
"voiceProfile":"en-US-BenjaminRUS",
"speed":1
}
},
{
"action":"hangup"
}
]
}
Invalid Input
{
"callflow":[
{
"action":"say",
"params":{
"text":"Invalid input, please call again.",
"voiceProfile":"en-US-BenjaminRUS",
"speed":1
}
},
{
"action":"hangup"
}
]
}
ClientActionID Parameter
Compared to the Simple IVR, notice the use of the clientActionID parameter in the callflows JSON. This parameter will also be passed by the VCA Webhook. This parameter is important to use in your server code to decide what IVR menu to play next for a user. It provides the context for where a user is in your IVR tree.
IVR Tree: Level 2
Webhook Received
Once the initial call is made, the server will be sent a webhook with call status information:
{
"payload":{
"eventId":"e2078079-eae8-11f0-ae64-a500004e488e",
"callId":"e1ff6a14-eae8-11f0-baa6-c93abb37794a",
"sessionId":"e1ff6a15-eae8-11f0-baa6-c147150ab00e",
"subAccountId":"8x8_test",
"callStatus":"CALL_RECEIVED",
"callDirection":"INBOUND",
"callType":"PSTN",
"source":"+656833033",
"destination":"+94778066434",
"sourceFormat":"MSISDN",
"destinationFormat":"MSISDN",
"sourceCountryCode":"SG",
"destinationCountryCode":"LK",
"callDuration":0,
"sipCode":200,
"timestamp":"2026-01-06T10:17:19.375Z"
},
"namespace":"VOICE",
"eventType":"CALL_STATUS",
"description":"Status update of a call"
}
When the user responds with a DTMF input in the main menu, your server will receive a VCA webhook. The important values to consider are the clientActionId (reservations or connect_call) which helps determine the IVR tree position.
IVR Tree: Reservations
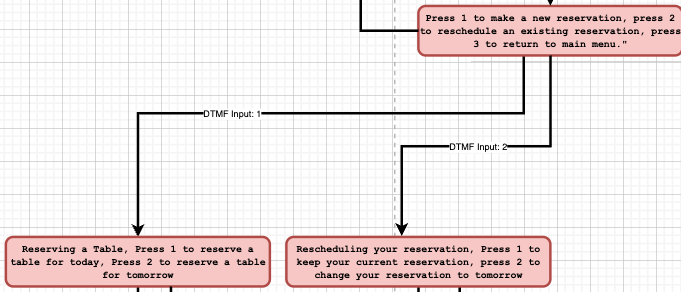
Note: DTMF Input 3 goes back to main menu
The menu that was played for the user for reservations was:
_Press 1 to make a new reservation, press 2 to reschedule an existing reservation, press 3 to return to main menu.
_
This table describes the menu and message played for the user depending on the DTMF input provided.
| DTMF Input |
Menu |
Message Played |
| 1 |
Book Table |
Reserving a Table, Press 1 to reserve a table for today, Press 2 to reserve a table for tomorrow |
| 2 |
Reschedule Table |
Rescheduling your reservation, Press 1 to keep your current reservation, press 2 to change your reservation to tomorrow |
| 3 |
Main Menu |
Welcome to ABC Restaurant, to book a table press 1, to speak to a representative press 2, to hear our restaurant hours press 3. |
| Other |
Invalid |
Invalid input, please call again. |
In order to respond to the webhook with the appropriate menu for the given DTMF input, return the corresponding Callflows JSON below. You should only respond with one, choose the appropriate response based on the DTMF input.
Book Table
{
"clientActionId":"book_table",
"callflow":[
{
"action":"sayAndCapture",
"params":{
"promptMessage":"Reserving a Table, Press 1 to reserve a table for today, Press 2 to reserve a table for tomorrow.",
"voiceProfile":"en-US-BenjaminRUS",
"speed":1,
"minDigits":1,
"maxDigits":1,
"digitTimeout":10000,
"overallTimeout":10000,
"noOfTries":2
}
}
]
}
Reschedule Table
{
"clientActionId":"reschedule_table",
"callflow":[
{
"action":"sayAndCapture",
"params":{
"promptMessage":"Rescheduling your reservation, Press 1 to keep your current reservation, press 2 to change your reservation to tomorrow.",
"voiceProfile":"en-US-BenjaminRUS",
"speed":1,
"minDigits":1,
"maxDigits":1,
"digitTimeout":10000,
"overallTimeout":10000,
"noOfTries":2
}
}
]
}
Main Menu
{
"clientActionId":"book_table",
"callflow":[
{
"action":"sayAndCapture",
"params":{
"promptMessage":"Welcome to ABC Restaurant, to book a table press 1, to speak to a representative press 2, to hear our restaurant hours press 3.",
"voiceProfile":"en-US-BenjaminRUS",
"speed":1,
"minDigits":1,
"maxDigits":1,
"digitTimeout":10000,
"overallTimeout":10000,
"noOfTries":2
}
}
]
}
Invalid Input
{
"callflow":[
{
"action":"say",
"params":{
"text":"Invalid input, please call again.",
"voiceProfile":"en-US-BenjaminRUS",
"speed":1
}
},
{
"action":"hangup"
}
]
}
IVR Tree: Connect Call
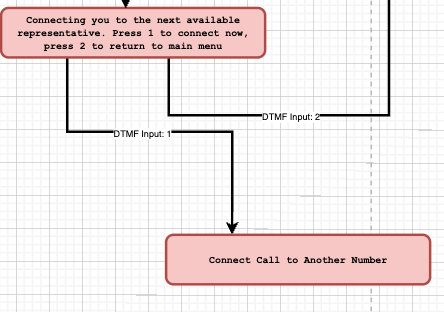
Note: DTMF Input 2 Goes back to the main menu.
The menu that will be played for the user for connect call is:
Connecting you to the next available representative. Press 1 to connect now, press 2 to return to main menu
This table describes the menu and message played for the user depending on the DTMF input provided.
| DTMF Input |
Menu |
Message Played |
| 1 |
Post Call |
N/A, user is connected directly to a number |
| 2 |
Main Menu |
Welcome to ABC Restaurant, to book a table press 1, to speak to a representative press 2, to hear our restaurant hours press 3. |
| Other |
Invalid |
Invalid input, please call again. |
In order to respond to the webhook with the appropriate menu for the given DTMF input, use the corresponding Callflows JSON below.
This callflow will immediately call the destination number and then connect the user on the current call to the destination number.
Connect Call
{
"clientActionId":"post_call",
"callflow":[
{
"action":"makeCall",
"params":{
"source":"{{Source Phone Number}}",
"destination":"{{Destination Phone Number}}"
}
}
]
}
This callflow will return the user to the main menu where they can start over and make a new choice.
{
"clientActionId":"main_menu",
"callflow":[
{
"action":"sayAndCapture",
"params":{
"promptMessage":"Welcome to ABC Restaurant, to book a table press 1, to speak to a representative press 2, to hear our restaurant hours press 3.",
"voiceProfile":"en-US-BenjaminRUS",
"speed":1,
"minDigits":1,
"maxDigits":1,
"digitTimeout":10000,
"overallTimeout":10000,
"noOfTries":2
}
}
]
}
Invalid Input
{
"callflow":[
{
"action":"say",
"params":{
"text":"Invalid input, please call again.",
"voiceProfile":"en-US-BenjaminRUS",
"speed":1
}
},
{
"action":"hangup"
}
]
}
IVR Tree: Restaurant Hours
<img src={require('../../../images/voice/level-2-restaurant-hours.png').default} alt="IVR Level 2 Restaurant Hours" title="IVR Level 2 Restaurant Hours" width="60%" className="zoom-image" />
This option will play a message for a user with restaurant hours:
Our restaurant hours are between 9AM and 9PM every day of the week.
Afterwards the call will hang up with the user without sending a VCA webhook. A VSS webhook will be sent at the conclusion of the call.
IVR Tree: Level 3
Webhook Received
When the user responds to the Level 2 Menu with a DTMF Input, the server will receive a webhook with call status information:
{
"payload":{
"eventId":"e2078079-eae8-11f0-ae64-a500004e488e",
"callId":"e1ff6a14-eae8-11f0-baa6-c93abb37794a",
"sessionId":"e1ff6a15-eae8-11f0-baa6-c147150ab00e",
"subAccountId":"8x8_test",
"callStatus":"CALL_RECEIVED",
"callDirection":"INBOUND",
"callType":"PSTN",
"source":"+656833033",
"destination":"+94778066434",
"sourceFormat":"MSISDN",
"destinationFormat":"MSISDN",
"sourceCountryCode":"SG",
"destinationCountryCode":"LK",
"callDuration":0,
"sipCode":200,
"timestamp":"2026-01-06T10:17:19.375Z"
},
"namespace":"VOICE",
"eventType":"CALL_STATUS",
"description":"Status update of a call"
}
Your server will also receive VCA webhooks for DTMF input with the clientActionId value to determine the IVR tree position.
IVR Tree: Book Table
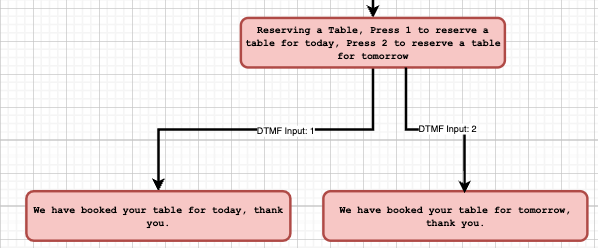
This table shows the possible messages that will be played depending on the user's DTMF input. After the message is played the call will end.
| DTMF Input |
Message |
| 1 |
We have booked your table for today, thank you. |
| 2 |
We have booked your table for tomorrow, thank you. |
| Other |
Invalid input, please call again. |
Here is the corresponding callflow that the server should respond with to trigger the IVR menu. The only value to change between the choices is the text which is played back to the user. Since this is a terminal message, all options should use Say+Hangup actions to end the call.
{
"callflow":[
{
"action":"say",
"params":{
"text":"{{Text to send the user}}",
"voiceProfile":"en-US-BenjaminRUS",
"speed":1
}
},
{
"action":"hangup"
}
]
}
IVR Tree: Reschedule Reservation

This table shows the possible messages that will be played depending on the user's DTMF input. After the message is played the call will end.
| DTMF Input |
Message |
| 1 |
Keeping your current reservation, thank you. |
| 2 |
Changing your reservation to tomorrow thank you. |
| Other |
Invalid input, please call again. |
Here is the corresponding callflow that the server should respond with to trigger the IVR menu. The only value to change between the choices is the text which is played back to the user. Since this is a terminal message, all options should use Say+Hangup actions to end the call.
{
"callflow":[
{
"action":"say",
"params":{
"text":"{{Text to send the user}}",
"voiceProfile":"en-US-BenjaminRUS",
"speed":1
}
},
{
"action":"hangup"
}
]
}
Voice Session Summary Webhook
Upon termination of the session, the Voice Session Summary (VSS) will be returned via webhook. For detailed information about the IVR Session Summary payload, see Session Summary (IVR).
Related Guides
-
Session Summary (IVR) – Detailed webhook payload reference for IVR session summaries
-
IVR Call Action Handling – Detailed documentation on handling VCA webhook callbacks for IVR, including payload examples and response structures
-
Send Callflow API – Complete API reference for the Callflows API used to initiate IVR sessions and control call flow
Error Handling
For error codes that may appear in the Voice Session Summary, see the Voice Error Codes reference. For API response status codes, see Voice Status Codes and Status Messages.
Support Channels